Converting an Aruba AP to an Instant Access Point (Without a Mobility Controller)
Prerequisites
- DHCP Server on the network
- Recommended: Configure Open 43 for automatic NTP time synchronization. The aruba AP will use this to set the correct time.
- A TFTP server. On Windows I recommended TFTPD64
- A Serial cable for connecting to the Aruba access point directly. (e.g. DSD TECH SH-U09BL USB-TTL Serial Cable with CP2102N)
- On Windows for serial connections you will need Putty and on Linux the minicom package should work just fine. This guide is mainly focused on using Linux.
Downloading the Aruba Instant Access Point firmware
- At the time of writhing it is possible to download the latest release of Instant Access Points without a HPE account.
- Simply look at the file name of the release you want to download on their portal, in my case
ArubaInstant_Hercules_8.4.0.0_68230then use wget while appendinghttp://common.cloud.hpe.com/ccssvc/ccs-system-firmware-registry/IAP/to the firmware release name.1 2 3 4 5 6
wget http://common.cloud.hpe.com/ccssvc/ccs-system-firmware-registry/IAP/ArubaInstant_Hercules_8.11.1.0_86591 --2023-04-11 13:20:40-- http://common.cloud.hpe.com/ccssvc/ccs-system-firmware-registry/IAP/ArubaInstant_Hercules_8.11.1.0_86591 ArubaInstant_Hercules_8.11.1.0_8 100%[=========================================================>] 22.29M 18.4MB/s in 1.2s 2023-04-11 13:20:42 (18.4 MB/s) - ‘ArubaInstant_Hercules_8.11.1.0_86591’ saved [23370908/23370908]
Setting up a TFTP Server on Debian/Ubuntu
- Allow TFTP network access (if you are using UFW)
1
sudo ufw allow tftp && sudo ufw reload && sudo ufw status numbered
- Install the tftp service and tftp client.
1
sudo apt install tftpd-hpa tftp
- Create a directory for hosting files on the tftp server.
1
2
sudo mkdir /opt/tftp-root
sudo chown tftp:tftp /opt/tftp-root
- Edit the following flie
/etc/default/tftpd-hpaand update the folder location to match the directory you created earlier.1 2 3 4 5 6
# /etc/default/tftpd-hpa TFTP_USERNAME="tftp" TFTP_DIRECTORY="/opt/tftp-root" TFTP_ADDRESS=":69" TFTP_OPTIONS="--secure"
- Restart the service
1
sudo systemctl restart tftpd-hpa && sudo systemctl status tftpd-hpa
- If you are only going to use this tftp server for adhoc firmware updates then disable automatic startup.
1
sudo systemctl disable tftpd-hpa - Move your downloaded IAP firmware into the tftp directory and set the correct permissions.
1
2
sudo mv ArubaInstant_Hercules_8.11.1.0_86591 /opt/tftp-root/
sudo chown tftp:tftp -R /opt/tftp-root
- Test if you can download locally on your PC.
1
2
3
4
5
6
7
cd ~
tftp localhost
tftp> binary
tftp> get /ArubaInstant_Hercules_8.11.1.0_86591
Received 23370908 bytes in 0.4 seconds
tftp> quit
ls
Stopping tftpd-hpa on your PC
When you have done using tftp-hpa its good practice to close the open holes and stop the service from running.
1
2
sudo ufw delete allow 69/udp && sudo ufw reload
sudo systemctl stop tftpd-hpa
Procedure
Part 1 - Connecting the console cable
Firstly you will need a serial adpator for connecting to Aruba access ports. As the serial connection is not a standard RJ45 connector like with other network devices I would recommend purchasing a breakout serial adaptor much like the one pictured below.
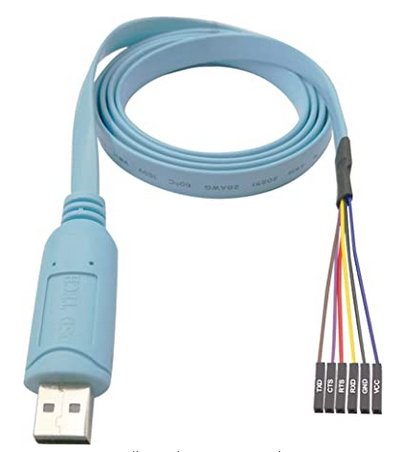 DSD TECH SH-U09BL w/ CP2102N Chip
The console port is located under a rubber plug on the 300 series from Aruba. Lift up the rubber plug to expose the 4 pin connector.
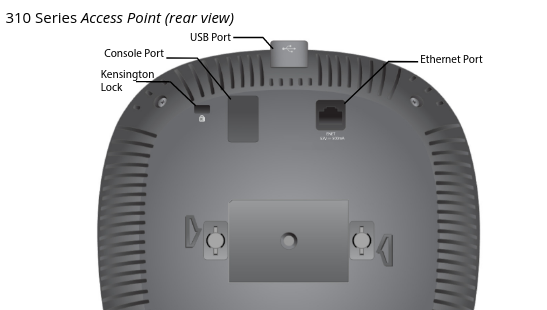 Console Port Location
Connect the TX, RX,and Ground (GND) pins only.
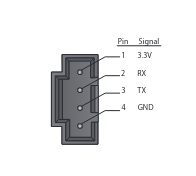 Console Port Pin Out
- On your PC you will need minicom installed.
1
sudo apt install -y minicom
- Plug in the USB serial adaptor to your PC and locate the device name. In this case I used a grep on the kernel logs and found the device was
ttyUSB0.1 2
grep tty /var/log/kern.log Apr 11 12:54:59 MYPC kernel: [2932193.187613] usb 3-5: FTDI USB Serial Device converter now attached to ttyUSB0
- Connect to the device using
minicom1
sudo minicom -b 9600 -o -D /dev/ttyUSB0
- Connect the network cable (PoE) to power up the AP.
If you don’t see any console output on your PC then you might need to reverse the TX and TX connectors which I had to do in my case with this particular USB adaptor.
If your keyboard input is not working make sure the HW and SW Flow Control is disabled with minicom.
Part 2 - Reflashing to Aruba Instant Access Point (IAP)
- Power on / Power cycle the access point.
- Interrupt the apboot boot process by pressing enter. (Need to be quick)
1
2
3
4
5
6
7
8
9
10
11
12
13
14
15
16
17
18
19
20
21
22
23
24
APBoot 1.5.5.7 (build 56398)
Built: 2016-09-08 at 14:21:29

Model: AP-31x
DRAM:  491 MB
SF:    Detected MX25U3235F with page size 64 kB, total 4 MB
Flash: 4 MB
NAND:  132 MiB
PCIE0: link up
PCIE1: link up
       dev fn venID devID class  rev    MBAR0    MBAR1    MBAR2    MBAR3
       00  00  168c  0046 00002   00 00000004 00000000 00000000 00000000
Power: 802.3at POE
In:    serial
Out:   serial
Err:   serial
Net:   eth0
Radio: qca9983#0, qca9990#1
Reset: cold
FIPS:  passed

Hit <Enter> to stop autoboot:  0
apboot>
apboot>
- You will need to get the serial number of the AP. A quick easy way is to simply type in
mfginfoto display the hardware information of the device.1 2 3 4 5 6 7 8 9 10 11 12 13 14 15
apboot> mfginfo Inventory: Card 0: System Wired MAC : 38:17:c4:c3:b4:00 Wired MAC Count : 2 Serial : CNF3J0TXBY # <<< here 3 Date Code : 111017 Card 1: CPU Assembly : 2010252C Major Rev : 06 Minor Rev/Variant : 00 Date Code : 111017 Card 2: Antenna Minor Rev/Variant : 01 - Back on your Linux make (make sure you have openssl installed) use the serial number to generate a SHA1 hash with the region of your AP e.g. US (USA), RW (Rest of the World) and the serial number. In this example our AP is in the US region and the serial number is CNF3J0TXBY. It is also possible to change the region using this step as well (I personally have not validated this though).
1
2
echo -n "US-CNF3J0TXBY" | openssl sha1
SHA1(stdin)= 8f75c7d6e48fa2d974c23a6107bbff1997149c17
- Using the has generated sha1 has use the following command on the AP to set the region.
1
proginv system ccode CCODE-US-8f75c7d6e48fa2d974c23a6107bbff1997149c17
- Then type in
invent -wto convert AP to IAP.1
invent -w
- Bring up the network interface of the AP.
1
2
3
4
# If your network has DHCP
dhcp
# If you need to setup a static IP address
setenv ipaddr 192.168.41.10
- Configure the TFTP Server address
1
setenv serverip 192.168.41.5
- Download the IAP boot images from the TFTP server and apply them to both boot partitions.
1 2 3
upgrade os 0 ArubaInstant_Hercules_8.11.1.0_86591 # wait for the image to be applied, then: upgrade os 1 ArubaInstant_Hercules_8.11.1.0_86591 - Perform a factory reset.
1
   factory_reset
- Save the environment to make sure the “turn off mobility” will not appear
1
   saveenv
- Then reset the device.
1
   reset
After the device has rebooted, if you want to use the console login the username is
adminand the password is the devices serial number e.g.CNF3J0TXBY. If you need to know the DHCP assigned IP of the access point after logging in you can type inshow ip interface brief
When logging in for the first time if you see this error
Internal error 8-0, please contact supportit just means the device is still initializing. Try again in a few minutes.