Arista EOS Networking Notes
Arista Networking Notes
MLAG
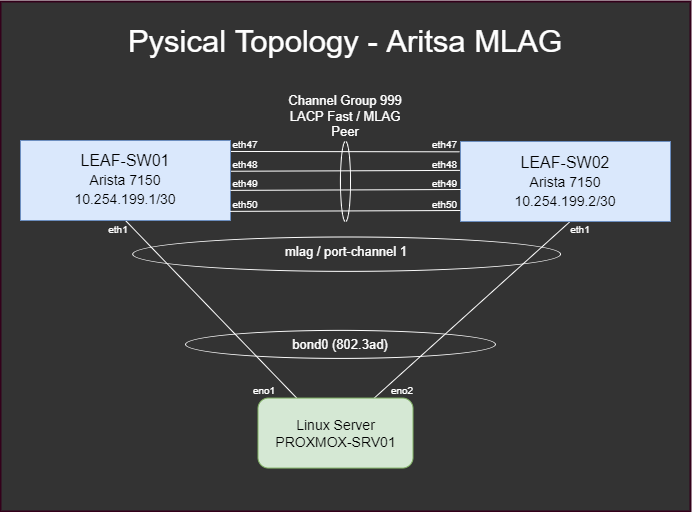 MLAG Physical Topology Exaample
1. VLAN Interfaces
First, configure a private /30 network to be used for interswitch communication on a VLAN that will be dedicated to MLAG commmunications. Spanning tree also needs to be disabled on the VLAN.
Both Switches:
1
2
3
4
5
6
no spanning-tree vlan 4094

vlan 4094
   !! [4094] MLAG Interconnect VLAN (10.254.199.0/30)
   name mlag-vlan
   trunk group mlagpeer
Switch 1 (LEAF-SW01):
1
2
3
interface Vlan4094
   no autostate
   ip address 10.254.199.1/30
Switch 2 (LEAF-SW01):
1
2
3
interface Vlan4094
   no autostate
   ip address 10.254.254.2/30
2. Port Channel Configuration (Interswitch Connections)
Create a port channel as a mlagpeer and assign the interfaces connecting betweeing the switches to the channel.
Both Switches:
1
2
3
4
5
6
7
8
interface Port-Channel999
   description mlag-port-channel
   switchport mode trunk
   switchport trunk group mlagpeer

interface Ethernet47-50
   description mlag-uplinks
   channel-group 999 mode active
3. MLAG Configuration
Then we need to configure the MLAG configuration. The peer-address statement refers to the partner switch and its recommended to setup a domain-id unique to each pair of switches.
Switch 1 (LEAF-SW01):
1
2
3
4
5
6
mlag configuration
   domain-id leaf_sw01_sw02_mlag
   heartbeat-interval 2500
   local-interface Vlan4094
   peer-address 10.254.199.2
   peer-link Port-Channel999
Switch 2 (LEAF-SW02):
1
2
3
4
5
6
mlag configuration
   domain-id leaf_sw01_sw02_mlag
   heartbeat-interval 2500
   local-interface Vlan4094
   peer-address 10.254.199.1
   peer-link Port-Channel999
At this point MLAG should now be operational. Type in show mlag on both switches to verify the mlag status and the peer-configs are consisten.
1
2
3
4
5
6
7
8
9
10
11
12
13
14
15
16
17
18
19
20
21
LEAF-SW01#show mlag
MLAG Configuration:
domain-id           : leaf_sw01_sw02_mlag
local-interface     :            Vlan4094
peer-address        :        10.254.199.2
peer-link           :     Port-Channel999
peer-config         :          consistent

MLAG Status:
state               :              Active
negotiation status  :           Connected
peer-link status    :                  Up
local-int status    :                  Up
system-id           :   02:1c:73:4c:c8:17

MLAG Ports:
Disabled            :                   0
Configured          :                   0
Inactive            :                   0
Active-partial      :                   0
Active-full         :                   0
4. Connect a server using MLAG
This article assumes you have already configured your server for LACP.
For reference below is an example of a Debian based operating system configured for LACP
1
2
3
4
5
6
7
8
9
10
11
12
13
14
15
16
17
18
19
20
21
22
23
24
25
26
27
# /etc/network/interfaces

auto eno1
iface eno1 inet manual
#Intel x520 LOM - 10gbe - Port 1

auto eno2
iface eno2 inet manual
#Intel x520 LOM - 10gbe - Port 2

auto bond0
iface bond0 inet manual
        bond-slaves eno1 eno1
        bond-miimon 100
        bond-mode 802.3ad  # LACP Mode (Requires switch configuration)
        bond-xmit-hash-policy layer2+3
        bond-lacp-rate 1  # LACP Fast to match the switch configuration
#Bond for inband management

auto vmbr0
iface vmbr0 inet static
        address 192.168.10.12/24
        gateway 192.168.10.1
        bridge-ports bond0
        bridge-stp off
        bridge-fd 0
# Bridge interface on bond0
In this example the server has 2x network ports, and each port is connected to Ethernet 1 of the switch.
Both Switches:
1
2
3
4
5
6
7
8
9
interface Ethernet1
   description "PROXMOX-SRV01"
   lacp rate fast
   channel-group 1 mode active

interface Port-Channel1
   description "PROXMOX-SRV01"
   switchport mode trunk
   mlag 1
for simplicity try to match the mlag number to the port-channel number
5. Verify MLAG Status
Once again run show mlag and verify the count for Active-full is 1 for your first server and the config is consistent.
1
2
3
4
5
6
7
8
9
10
11
12
13
14
15
16
17
18
19
20
21
LEAF-SW01#show mlag
MLAG Configuration:
domain-id           : leaf_sw01_sw02_mlag
local-interface     :            Vlan4094
peer-address        :        10.254.199.2
peer-link           :     Port-Channel999
peer-config         :          consistent

MLAG Status:
state               :              Active
negotiation status  :           Connected
peer-link status    :                  Up
local-int status    :                  Up
system-id           :   02:1c:73:4c:c8:17

MLAG Ports:
Disabled            :                   0
Configured          :                   0
Inactive            :                   0
Active-partial      :                   0
Active-full         :                   1
The show mlag interfaces command can show
1
2
3
4
5
LEAF-SW01#show mlag interfaces
                                                                                     local/remote
   mlag       desc                                 state       local       remote          status
---------- ------------------------------ ----------------- ----------- ------------ ------------
      1       PROXMOX-SRV01                  active-full         Po1          Po1           up/up
Other useful notes
Enable 3rd party transceivers
1
2
3
4
5
6
7
8
localhost login: admin
localhost>enable
localhost#bash

Arista Networks EOS shell

[admin@localhost ~]$ touch /mnt/flash/enable3px
[admin@localhost ~]$ sudo reboot